Connect Salesforce to your desk
Create one Salesforce External Client App, paste its credentials into the Desk, and the Desk can read and update Leads and Contacts without anyone staying logged in. This guide follows the one supported setup from start to finish.
One Salesforce connection is shared by the whole Desk account. Personas can have separate mailboxes, voices, and campaigns, but they all use this Salesforce org and integration user.
First, give the desk its own Salesforce user
The Desk should not borrow a person's Salesforce identity. With its own integration user, you control exactly what it can see, its changes are labeled clearly in Salesforce history, and you can switch it off without affecting an employee.
Why a user at all, if this is an app integration? The app is the sign-in method; the user is the identity. Salesforce runs every API call as the app's Run As user, and that user's license, profile, and permissions decide what the Desk can see and change.
- In Salesforce: Setup → Users → New User. Name it something honest, like
desk@yourcompany.com. - User License: Salesforce. Do not choose Salesforce Platform. For the first connection, choose the System Administrator profile and test it. Afterwards, replace it with a restricted profile or permission set that has API Enabled and Lead/Contact read, create, and edit access.
- Use a real address in the Email field. The activation email goes there, and it is the one thing you cannot fake. The Username only has to be unique across all of Salesforce and looks like an email without being one.
- Stay signed in as your administrator. Everything from here is admin work. You do not need the integration user's password or security token.
Connect with an External Client App
You create one small app in Salesforce, tell it to run as the Desk's integration user, and paste four values into the Desk: the user's Salesforce username, your My Domain URL, the app's Consumer Key, and its Consumer Secret. No password, security token, or access token is needed.
1. Create the app
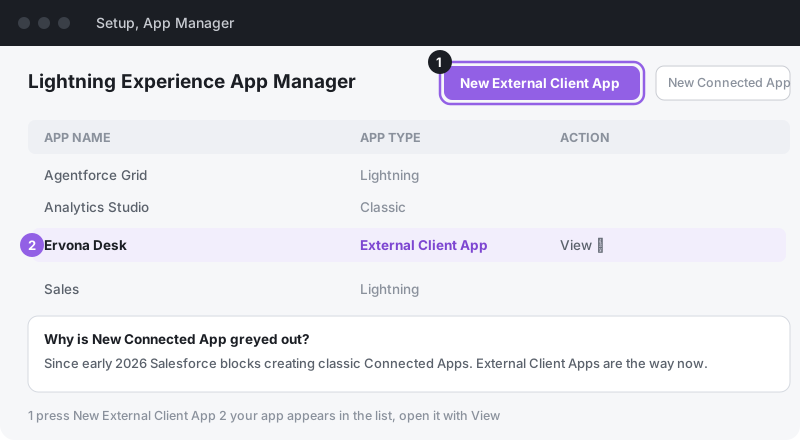
- Setup → App Manager → top right, New External Client App.
- Name it (say, Ervona Desk) and add your email. Then open the API (Enable OAuth Settings) section and tick Enable OAuth. The other sections on this form — Web App, Canvas, Mobile, Push, Notification — are for products the desk does not use. Leave them closed.
- Callback URL:
https://login.salesforce.com/services/oauth2/callback. The form insists on one; nothing ever uses it. The desk signs in with a key and never sends anyone's browser to Salesforce, so there is no redirect to catch. - For Scope, select only Manage user data via APIs (api). Do not add Full access or refresh-token scopes. Press Create.
The next part is not on this form. The Client Credentials Flow and its Run As user only appear once the app exists, on the app's own Settings and Policies pages. If you are hunting for them while creating the app, that is why you cannot find them.
2. Turn on the Client Credentials Flow and pick the run-as user
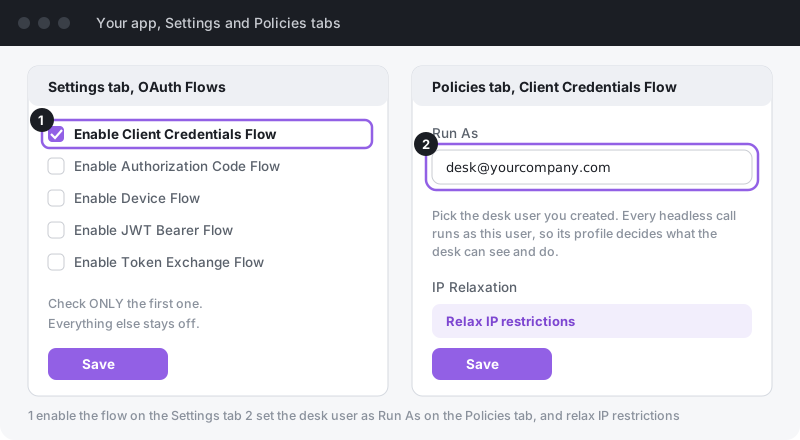
- On the app's Settings page, enable only Client Credentials Flow. Leave the other flows and the entire Security section at their defaults, then save.
- Return to External Client Apps Manager, open the action menu beside your app, and choose Edit Policies. This is a separate page from Edit Settings.
- Under OAuth Flows and External Client App Enhancements, check Enable Client Credentials Flow again. A required Run As (Username) field appears. Enter the integration user's exact Salesforce Username from Setup → Users → Users — not its Email field, even though Salesforce's placeholder says "Enter an email address." Set IP Relaxation to Relax IP restrictions, then save.
- Then wait a couple of minutes before connecting. Salesforce can take a moment to publish a new app or changed settings across its systems. If your first Connect fails immediately after a save, wait and retry once before changing anything.
The Client Credentials box must be enabled twice: once in Edit Settings and once in Edit Policies. Policies is also where you set Run As. If the policy box or Run As user is missing, Salesforce returns no client credentials user enabled.
3. Copy the Consumer Key (Client ID) and Consumer Secret (app secret)
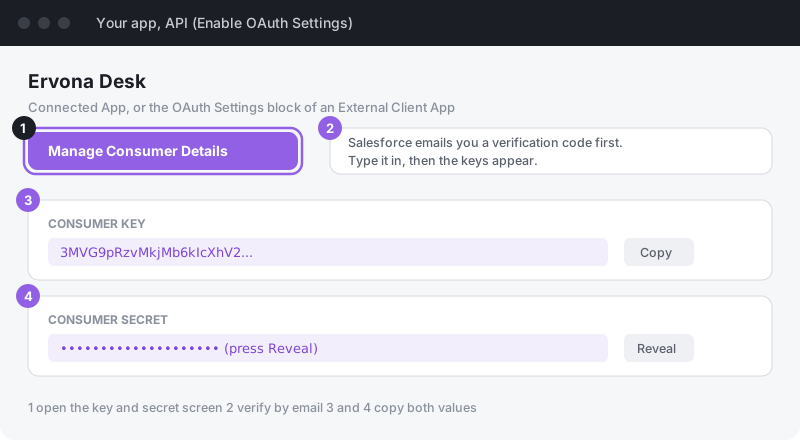
- In Salesforce Setup, open External Client Apps Manager, select your app, and open its Settings tab. Expand OAuth Settings, press Consumer Key and Secret, and complete the identity check Salesforce asks for.
- Copy both values: Salesforce's Consumer Key goes into the Desk's Consumer Key (Client ID) field; Salesforce's Consumer Secret is the app secret and goes into Consumer Secret (app secret). Do not copy an access token, API token, security token, app ID, or API name — none of those is a substitute.
- If the Consumer Key and Secret button is missing or errors, your Salesforce admin account needs permission to view External Client App consumer secrets. Add View External Client App Consumer Secrets in Metadata to an admin permission set, then reopen the app. Treat the secret like a password: paste it only into the Desk, never into chat, email, or a support ticket.
4. Copy your My Domain URL and connect
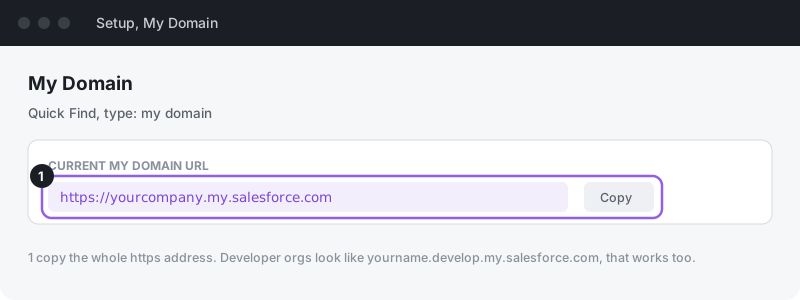
- Setup, Quick Find: my domain, and copy the Current My Domain URL (looks like
https://yourcompany.my.salesforce.com). - You now have everything the Desk asks for: the dedicated user's exact Salesforce username (which can differ from its email), the Current My Domain URL, the app's Consumer Key, and its Consumer Secret. You do not need the user's password, a Salesforce security token, or a pre-made access token.
- In the Desk, open Your CRM → Connect Salesforce. Paste the username, My Domain URL, Consumer Key, and Consumer Secret, then press Connect. The Desk obtains access tokens itself and stores the credentials write-only, so they are never shown again.
Where imported leads appear: Salesforce assigns new leads to the app's Run As user. If you are looking at a saved My Leads view for a different owner, they will be hidden. Open the standard Leads tab with no Owner filter, or search the lead's exact email address.
If Connect says no
- "no client credentials user enabled": open Edit Policies, enable Client Credentials Flow there, and fill Run As (Username). Enabling the flow only on Edit Settings is not enough.
- "invalid_grant" or "grant type not supported": confirm Client Credentials Flow is saved on both Edit Settings and Edit Policies, and confirm Run As contains the user's exact Salesforce Username.
- "That does not look like a Salesforce My Domain URL": the address is not a Salesforce web address. Paste the full https URL from Setup, My Domain. Pasting your Lightning page address is fine, we convert it.
- "Two-factor verification required": your Desk session needs a fresh two-factor check. Sign out of desk.ervona.ai, sign back in, and retry.
- Connected, but the desk sees no leads (or the test says
NOT_FOUND: The requested resource does not exist): the Run As user's profile cannot access Leads or Contacts, or the user has an unsuitable license. Confirm User License: Salesforce; select System Administrator to verify the setup quickly, then move to a restricted profile/permission set with API Enabled and Lead/Contact read, create, and edit access. No reconnect is needed. - "You must enter a value" on Profile while creating the user: the Profile list reloads whenever the User License changes, and the value on screen is not committed until you pick it again, so the field looks filled in while it is empty. Open the dropdown and re-select the profile. If it still refuses, press Cancel and start a fresh New User, setting the User License first and the profile immediately after.
- The activation email never arrives: check the address in the user's Email field for a typo. Username and Email are separate, and only Email receives anything.
See the desk's work in your own Salesforce reports
Every touch and every reply is already logged on the record as a completed task, and the desk sets the lead status and the owner when it hands someone over. That covers the activity timeline, but it does not put the desk into the reports and dashboards you already run.
If you want that, create these fields on Lead and on Contact. Create the ones you want and skip the rest. Nothing breaks if you create none of them, and nothing needs to be switched on afterwards. The desk checks which of them exist and fills in the ones it finds.
| Field name (API name) | Type | What lands in it |
|---|---|---|
Ervona_Status__c | Text | Where the lead got to: Warm - replied when the desk got a real reply worth a person's time, or Needs a human when it handed over for another reason. |
Ervona_Last_Touch__c | Date/Time | When the desk last did something with this record. Useful for "no Ervona activity in 30 days" style reports. |
Ervona_Assigned_To__c | Text | The email address of the rep the lead was handed to. |
The names have to match exactly, including the __c that Salesforce adds to every
custom field. Once they exist you can group, filter and chart on them like any other field, and
build a Flow that fires the moment the desk marks somebody warm.
A field the desk cannot write to is skipped, not retried, and the rest of the write still lands. So a formula field or one the integration user cannot edit costs you that column and nothing else.